By Woody Leonhard
Since the debut of Windows 95, the Start menu has offered an easily navigated and extensible haven for all the programs we don't use every day.
In Part 1 of a series of stories on getting the most out of Windows' Start menu, we start with the basics: pinning applications, folders, and files.
Future installments will cover just about everything you need to know about the Start menu — how to use it, change it, gussy it up, and dress it down. The Start menu is something we use dozens of times a day. Take a few minutes and make it look the way you want it to!
Although Win7's Start menu has a slightly different look from Windows XP's classic design, in many ways they work the same. And though the techniques covered in this series focus on Win7's version, you'll find that many of these tips apply to XP's Start menu as well.
Classic version or new, the Windows Start menu has three major sections (shown in Figure 1), each giving different approaches to navigating Windows.
Left column: This section holds items (programs, folders, and files) that you use frequently. Those above the faint line are items pinned there by the user; those below the line are recently invoked programs — at least those programs started via the Start menu — and automatically added by Windows.
Right column: This list provides shortcuts to many of Windows 7's predefined folders and libraries plus quick access to key features such as the Devices and Printers panel and the Control Panel. Most Windows users probably think it's a fixed list, but it's not — you can customize it.
Bottom: In addition to the Shut down button found in Windows XP, the bottom of Win7's Start menu now has the always-useful Search programs and files box.
The Windows 7 Start menu
Let's start by taking a look at how you can change the left-hand list of programs, folders, and files. If you want to make the changes apply to different user accounts on a PC, you have to be logged in with administrator rights.
Making simple changes to the Start menu
First, a note about terminology. All versions of Windows between Win95 and WinXP had a button in the lower-left corner of the desktop emblazoned with "Start." In Vista and Win7, Microsoft replaced the classic square Start button with a frilly (and unlabeled) round button, which practically everyone except Microsoft refers to as the "orb." (Surprisingly, you can even change the orb.) To minimize confusion, I'll tell you to click Start — which on Win7, of course, means to click the orb. Fair enough?
Changing much of the Start menu is a cinch. Here's a review of how to make several of the most common Start menu changes:
To change the picture of the current user (the picture in the upper-right corner of the Start menu — a daisy by default), simply click it. Windows takes you through the necessary steps.
To remove a program from the pinned list in the upper-left corner or the most recently used list below, right-click the entry you don't want and choose Remove from This List.
To add a program to the pinned programs list, navigate to the program (by clicking, say, Start/All Programs), right-click the program and choose Pin to Start Menu.
If you bought a new computer with Windows 7 preinstalled, the computer maker might have sold one of the spots (or maybe two or three spots) on the Start menu to another product vendor. You can always delete those pesky Start menu advertisements by right-clicking them and choosing Remove from this list.
Amazingly, that covers about 80 percent of the questions I get about the Start menu.
Pinning to the Start menu — the rest of the story
There's much more to the pinned list than first meets the eye.
The All Programs menu is the easiest place to find and pin applications, but you can also use Windows Explorer or the Start menu's Search box. Once you've found the program file, simply right-click it and choose Pin to Start Menu.
If you want to pin a program currently on your Taskbar onto the Start menu, the simple right-click trick doesn't work. When you right-click a Taskbar icon, you get the jump list — and there is no option to Pin to Start Menu. But there's a trick. All the items on your Taskbar are stored as shortcuts in the folder
c:\users\your name\AppData\Roaming\Microsoft\Internet Explorer\Quick Launch\User Pinned\TaskBar.
Navigate to that folder in Windows Explorer, right-click on the item you want to put on your Start menu, and choose Pin to Start Menu. Voilà !
If you pin a program on the Start menu by right-clicking on it and choosing Pin to Start Menu, Windows creates a separate, pinned copy in the Start menu. Your original — the program you right-clicked — stays where it was. If you right-click a program listed in the recently used section of the Start menu and move it to the pinned section, again: the original program doesn't move, but Windows does take the entry off the recently used list.
You can put pinned programs into any order you like. When the program, file, or folder gets pinned, it appears at the bottom of the pinned pile. To change the order, just click-and-drag the program to any other spot in the pinned list.
Even better, you can give your pinned programs names that you prefer. Right-click the program and choose Properties. On the General tab, change the name in the top box to whatever you want to show on the Start menu.
Pinning folders and files to the Start menu
Many online help sites tell you that you need to edit the Registry or create a complex shortcut to pin folders to the Start menu. In Windows 7, you don't need to do any of that. Just click and drag the folder to the pinned list as I explain here, and you're done. The same trick works for files, too. While the technique I mention here isn't exactly undocumented, it's certainly not well known.
To pin a folder or file — or just about anything else — to the Start Menu, navigate to the folder or file and left-click it. Now drag it down to the Start orb. Hover for a moment or two, and the Start menu opens. Keep dragging the file or folder up to the pinned list. Settle on the location you'd like, and drop the file or folder. (There is, unfortunately, not a simple way to pin a folder to the taskbar.)
If you pin an Office template file to the Start Menu — a Word .dotx or Excel .xlt file, for example — every time you select the template in the Start Menu, Windows will start the application (Word, Excel, PowerPoint, whatever) with a new document based on that template. That's the fastest way I know to work with form letters.
The drag-and-drop trick also works on programs that don't show Pin to Start Menu when you right-click on them. It's really that easy.
Thursday, February 23, 2012
Saturday, February 18, 2012
Our guide to cleaning and maintaining your keyboard.
We have split the guide into two parts, the first part is for keyboards that just need a quick clean, the second part is for membrane keyboards (most standard keyboards) and includes removing the keys for a thorough cleaning.
To keep your keyboard in top condition the moderate cleaning could be done weekly, and the more thorough clean could be done every 2 months (depending on use).
spr
What you will need:
lint free cloth.
dry cloth or duster.
suitable cleaning fluid (isopropyl alcohol).
cotton buds.
Can of compressed air or vacuum cleaner.
Flat tip screwdriver (optional for thorough clean).
spr
Moderate cleaning (quick and easy)
spr
First, shutdown your PC and remove the mains plug, unplug the keyboard (remember which socket) and hold it upside down to release any debris from inbetween the keys (pressing the keys is a good way to release it).
If you have a can of compressed air then use it to blow any debris from around and under the keys, if not then use the hose of a vacuum cleaner to remove it.
Now take one of the cotton buds and put a couple of drops of the cleaning fluid on it, use the cotton bud to clean the sides of the keys as seen in fig 1.1. cleaning keyboard 1
After cleaning the sides of the keys take your lint free cloth and dampen it with your cleaning fluid (don't put the liquid directly on the keyboard), give the surface of the keyboard a good wipe over using the cloth to trace the contours of the keys (see fig 1.2).
When you have finished give the keyboard a wipe over with the dry cloth/duster, you should now have a nice clean keyboard, to clean it more thoroughly follow the guide below. how to clean your keyboard 2
Thorough cleaning (takes longer and requires patience)
Standard membrane keyboards only
(not laptops or non-membrane keyboards)
Shutdown your PC and remove the mains plug, unplug the keyboard (remember where it was plugged in) and hold it upside down to release any debris from inbetween the keys.
This is where the patience comes in, make a note of the position of all the keys or you will have trouble putting them back correctly, alternatively just remove the letter keys A - Z from the keyboard (which is where the most of the dust/debris will be) and refer to fig 1.4 as a reference to put them back.
All the keys can be removed although the larger keys (space bar, enter key, shift keys, backspace, caps lock, etc) can be difficult to put back so you might avoid removing them.
Remove the keys using the screwdriver, ease the screwdriver under the key and gently lift the key top off (see fig 1.3).
note: don't forget to make a note of their position !! remove key cap off keyboard keyboard layout
When you have removed all the keys (except any keys you wish to avoid) use the compressed air (or vacuum cleaner) to remove any dust and debris from inside the keyboard.
Now is a good time to give the keys a proper clean, for best results clean each one individually (the patience thing again) with the cloth and cleaning fluid, when clean, wipe them over with the dry cloth.
Before replacing the keys, take your lint free cloth and dampen it with your cleaning fluid (don't put the liquid directly on the keyboard), give the surface of the keyboard a good wipe over ensuring to clean as much as possible any keys that you haven't removed.
When the keyboard is nice and clean replace the keys according to your notes or if you have just removed the letter keys use fig 1.4 as a guide, to put the keys back on position the key in place and press gently but firmly until it clicks home.
After replacing all the keys give the keyboard a quick wipe over with your dry cloth and you have a nice clean keyboard.
Saturday, February 11, 2012
Netflix’s Advantages over Amazon Instant Video
Netflix’s Advantages over Amazon Instant Video
by Gabe Gagliano
Wired’s Tim Carmody provided a thoughtful analysis of how Amazon Instant Video could overtake Netflix as well as iTunes in the streaming video area. Carmody makes a strong argument about Amazon’s value proposition as a one stop shop for video with it’s all-you-can-watch Prime video streaming, on-line rentals and purchases as well as its DVD business. Carmody suggests that more content and device availability are two of the keys for Amazon Instant Video to become the market leader. Well, the devil is in the details and in both of these areas as well as others, Netflix currently has a number of advantages over Amazon Instant Video.
Content: If you look at the services apples to apples, Netflix still has a significant lead over Amazon when it comes to the total number of TV shows and movies. When I last looked in December, Netflix had over 49,000 TV episodes and movies while Amazon had just over 11,600. While Amazon publicly states they have 13,000 titles available as part of Prime streaming, it appears they count both the high definition and standard definition versions of TV episodes as two titles. Amazon does have some unique offerings such as next day availability for select PBS shows including Frontline and the News Hour. Regardless, Amazon will have to commit to paying some serious dollars to approach the size of Netflix’s streaming catalog.
Devices: There’s a few reasons why Netflix is on 800+ devices versus Amazon Instant Video’s 300+. Carmody didn’t see a obvious reason stopping Amazon from creating an Amazon Instant Video player for iPads and iPhones but there’s a couple. As Reed Hastings stated on their recent earnings call, Netflix is not interested in the pay-per-view or purchase market. Netflix is only interested in delivering an all-you-can-watch streaming catalog at one low price. For device penetration, this is a real advantage for Netflix. Netflix can peacefully co-exist on many devices with paid services such as Apple’s iTunes and the Sony Entertaintment Network. While Amazon could develop an iOS app, I doubt Apple would approve a direct competitor to iTunes. Furthermore, given that iOS devies don’t natively support Flash video, one can’t even watch Amazon content through the Safari web browser (Amazon could create a second set of iOS-compatibile encodes as YouTube did).
Also, one has to question how Amazon Instant could be on most of Sony’s Blu-ray players, streaming boxes and HDTVs but not on the Playstation3 which has sold tens of millions. Speaking to industry sources, I’ve learned that Amazon usually develops the Instant Video client itself. So, in the case of Sony, they would have to author yet another version of the app for the Playstation3 in addition to the two other versions they’ve created for Sony’s other devices (while Amazon is probably willing it’s probably more likely that Sony doesn’t want competition to its service). Another example is TiVo which was one of the first boxes with Amazon Instant Video when it was only a download service. However, the TiVo version has not seen a major refresh since its initial release and hence, it cannot access the Amazon Prime Streaming Library. Implementations on other devices such as Blu-ray players don’t have access to surround sound. Amazon would be better off providing a software SDK and user interface guidelines to device manufacturers as Netflix does. Regardless, there there is a real ceiling to Amazon’s market share by not being on iOS devices.
In addition, Netflix has encouraged a universe of third-party web apps by providing an API and full XML version of its catalog to any third-party developer. While Amazon does have it’s Associates API, it’s limited in what it can do compared to Netflix. The end result is that there is a large number of web applications that incorporate the Netflix data.
Audio and Video Quality: Netflix offers most of its HD content in 1080P whereas Amazon offers 720P. HBO GO, which also offers 720P HD video, provides its video at a higher bit-rate resulting in a smoother, better-looking picture. Also Netflix, VUDU and HBO GO have all adopted the more bandwidth efficient and better sounding Dolby Digital Plus for surround sound (Amazon uses Dolby Digital which still sounds good). In the world of mobile devices, these audio and video differences don’t matter much (unless you’re hooking the tablet or mobile phone to a TV). However, as consumers purchase HDTVs with bigger screens, the difference is apparent. Unless Amazon is saving significant dollars in licensing costs, there’s no reason not to make the move to higher quality encodes, 1080P and Dolby Digital Plus. (Downloads to the TiVo Premiere are in 1080P and Dolby Digital)
Content Discovery: Not only is it important to have great content but there needs to be an easy way to find it. Netflix’s Instant Queue is one of the service’s most convenient and popular features. Anytime Netflix has messed with it , they’ve been inundated with customer complaints (remember when expired titles disappeared?). While Amazon has a “video library” to track purchased titles, there’s no way to bookmark or have a queue of Prime streaming titles. Netflix also distinguishes itself with its recommendations. However, its Achilles heal has always been that the families share one account leading to some humorous and sometimes disturbing recommendations (Since you like Phineaus & Ferb, you may also like Psycho ). This is probably the easiest area for Amazon to catch up in since they are aleady famous for the “Customers who bought this item also bought…” from their website.
Parental Controls: When Amazon introduced its Prime service, it did so without any parental controls (purchases require a pin-code). While Netflix does have parental controls, they are clunky to use at best. Netflix indicated on their Q4 conference call that they would be rolling out user profiles for family members sometime this year.
Closed captions: Subtitled movies in Amazon’s Prime streaming catalog are far and few between. As the market leader, Netflix has been criticized for not captioning all of its content. The National Association for the Deaf sued Netflix last year for violating the Americans with Disabilities Act. Netflix has made progress, notability in the area of TV content but still fell short of its goal of captioning 80% of its content last year. If Amazon is to become the market leader, they would be subject to the same scrutiny. Amazon at the moment only has subtitles available on a small number of movies. Since they are subtitled (as opposed to captioned), they cannot be turned off. The Amazon Instant Video player does not appear to have the ability to show closed captions.
In closing, Amazon Instant Video has a lot of potential with its myriad of options to satisfy a customer’s video desires. On the other hand, Netflix is focused on becoming a pure Internet based streaming service. While that focus has given Netflix the lead in many areas, can they survive a focused charge from Amazon with its deep pockets?
Roku 2 Tips
By Gabe Gagliano
Are you happy with the Roku you received this Christmas? Everyone I recommended a Roku to this past holiday has been happy with it. They all love the easy set up and that they can access lots of content from Netflix, Hulu Plus, HBO GO and Amazon Instant Video. It’s my go-to box for Netflix as it provides 1080P video and Dolby Digital Plus and it’s one of the few Amazon Instant Players that outputs Dolby Digital surround sound. If you’re looking for some basic tips on finding channels and setting up your Roku, there are good posts at the Roku Blog and GigaOM. So, here’s my list of Roku 2 tips (biased towards the XS which I own):
Roku 2 XS
Roku 2 XS
Get the Remote App for iOS or Android: Roku now provides a free remote control app to control its various Roku 2 and LT boxes. There’s two features I like in particular about the remote app. Number one is you can directly jump between channels without going back to the main menu. More importantly, you can use the app’s keyboard to perform searches or sign into a service for the first time. Finally, it’s always handy to have if you’ve lost your remote control.
Netflix Channel Extras: While you’re watching a title, press the down arrow to see the title name, episode name, length, year and rating (this also works in Amazon Instant Video) overlay on the screen. Also, while browsing titles on the grid, pressing the “*” key on the remote gives you the option to add or remove a title to your Instant Queue, rate a title or to jump to the search function.
Free Channels: One of the reasons you purchased a Roku was to save on money on cable and the Roku has a number of free content choices. Some of the free channels include Crackle, Chow (Cooking), Tech TV, TED talks, Newscaster, Wall Street Journal, CNBC, NBC News as well as number of religious ones. WSJ has a number of live programs throughout the day as well as a number of recorded features. The NBC News channel runs a few hours behind when the Nightly News is broadcast. However, while the channel is convenient for watching a portion of the nightly news, it puts each story into a separate clip requiring buffering and therefore a significant pause between segments. While both of these channels are free, they are supported by commercials. Roku’s Newscaster channel gives you access to variety of other news stations such as the BBC, ABC, CBS, Fox News and the Al Jazeera live stream.
If you see the Roku always re-downloading games or channels, I recommended you spend $5 on expanding its on-board storage with a 2 GB microSD flash memory card. The Roku has a small amount of local storage it uses to store channels and games. The games in particular can take up a significant amount of storage space. When this cache storage runs out of space, it discards some channels and loads the channel you are looking for. Note that I have just over 20 channels and Angry Birds loaded up but I haven’t seen the need for the microSD card yet.
Play Your Media with the USB Channel: The Roku 2 XS as well as the older XDS come with a USB port to attach a USB stick or drive. From there, one can play music, view photos or watch video files. Recently, Roku added support for MKV video files. An MKV is a wrapper or container file that can hold different types of video and audio. I used Handbrake to rip some DVDs using H.264 encoding into both the MKV and the M4V file containers (the Roku only supports H.264 video on the USB Channel). Despite the fact that both files use H.264, the M4V container provides quicker load times when you fast forward and rewind. Besides that, both containers support similar sets of features. It does not appear that the Roku supports chapter markers in either format. If you want to enjoy surround sound from your ripped DVDs, it’s best to chose “AC3 passthrough” when ripping the DVD in Handbrake.
For music, the Roku supports both MP3 and unprotected AAC files. It’s best to organize all of your music below a top level folder on the USB drive if you want to be able to play it or shuffle it all at once. There’s currently no support for playlists. Photos are pretty straightforward with support for JPG and PNG files.
Private Channels: In addition to the channels in the Roku Channel store, there are also private channels that require a code to use them. Note that a significant number of the private channels on the list are either no longer available or are now public channels.
Bandwidth: If you’re interested in what bit rate your Roku is streaming at, you can enable a debugging mode that will pop a informational message when a stream starts playing. To activate it, go to the home screen on the Roku. From the remote, enter the following key sequence:
Press Home 5 times
Presss FF 3 times (not the DPad but the >> key)
Press REWIND 2 times (not the DPad but the << key
For this to work right you have to hit the buttons fairly quickly with a pause of about a one second between presses. Not too quick though! When you hit the home button, you want to hear its sound effect before you hit a remote key again. It definitely takes some practice. When you are successful, a screen like the one below will appear. Select “Enable Playback debugging” to have see the streaming bit rate show up when you start a title.
Roku Debugging Bandwidth Screen
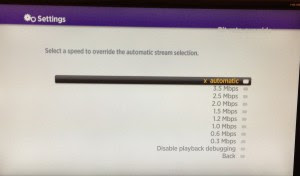
You can disable the debugging screen by entering the same sequence of keys on the remote and choosing the disable option. Note, that this debugging screen no longer works in Netflix as the new version uses adaptive bit rate streaming. However, for other services like Amazon Instant Video and HBO GO, it will tell you the bit rate of the video stream.
Subscribe to:
Posts (Atom)